
An ICEE machine offers a convenient and fun way to create slushies at home‚ combining ease of use with quick results for delicious treats effortlessly.
1.1 What is an ICEE Machine?
An ICEE machine is a countertop appliance designed to create frozen slushies at home. It uses a pre-frozen ice canister to crush ice and mix it with flavored liquids‚ producing a smooth‚ icy treat. The machine is simple to operate‚ making it accessible for both slushie enthusiasts and first-time users. By following basic instructions‚ users can quickly prepare refreshing drinks with minimal effort‚ ensuring consistent results every time. Its compact design and easy-to-use interface make it a popular choice for homemade slushies‚ perfect for parties‚ family gatherings‚ or everyday enjoyment.
1.2 Brief History of ICEE Machines
ICEE machines were first introduced in the mid-20th century as a solution for creating frozen drinks at home. The concept emerged from the need for a portable and user-friendly device that could produce slushies without complex machinery. Over the years‚ the design evolved to include pre-freezing mechanisms and easier operation‚ making it accessible to households. Today‚ ICEE machines are popular for their convenience and ability to craft customizable frozen beverages‚ maintaining their reputation as a fun and practical kitchen appliance for slushie lovers of all ages.
1.3 Benefits of Using an ICEE Machine
Using an ICEE machine offers numerous advantages‚ making it a valuable addition to any home or event. Its compact design allows for easy storage and portability‚ while its user-friendly interface ensures minimal effort in creating frozen treats. The ability to customize flavors and consistency provides endless creativity for both kids and adults. Additionally‚ it saves money by eliminating the need for store-bought slushies. The machine also promotes fun and engagement‚ making it a great tool for parties or family gatherings. Its efficiency and durability further enhance its appeal as a practical and enjoyable kitchen appliance.
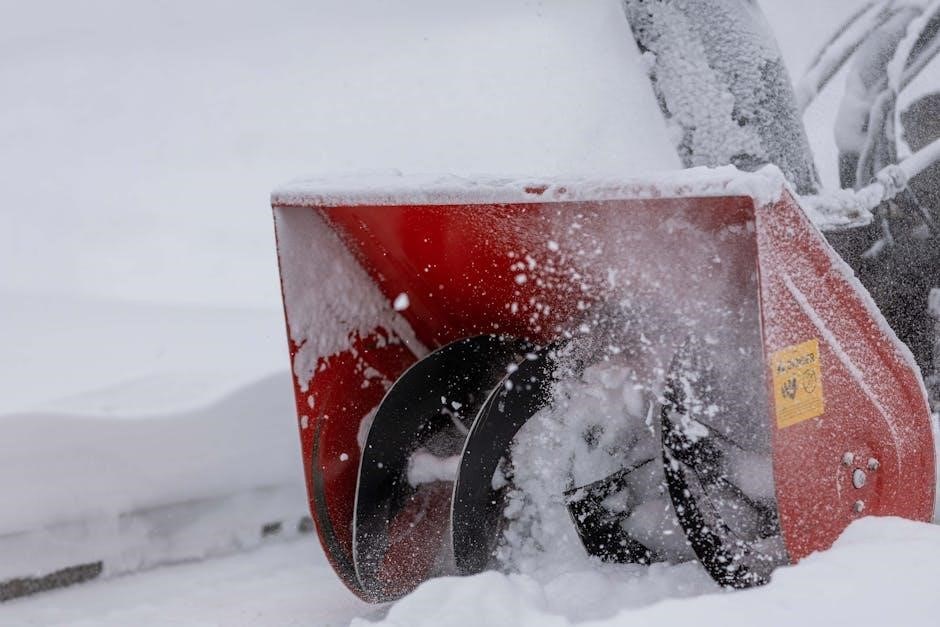
Understanding the Components of an ICEE Machine
An ICEE machine consists of key parts like the motor base‚ ice canister‚ and drive sprocket‚ each playing a vital role in freezing‚ crushing‚ and dispensing ice efficiently.
2.1 Overview of Key Parts

An ICEE machine is built with essential components designed for efficient operation. The motor base powers the machine‚ while the ice canister holds and crushes ice into slush. The drive sprocket connects to the motor‚ ensuring smooth ice movement. Additional parts like the control panel and dispensing nozzle simplify operation. Each part works together to freeze‚ crush‚ and dispense ice consistently. Understanding these key elements helps in proper assembly‚ maintenance‚ and troubleshooting‚ ensuring optimal performance for making perfect slushies every time.
2.2 The Role of the Ice Canister
The ice canister is a central component of the ICEE machine‚ designed to hold and process ice. It is typically detachable‚ allowing easy access for adding ice and cleaning. The canister is engineered with internal mechanisms to crush or shave ice into the desired slush consistency. Proper use of the ice canister ensures efficient freezing and dispensing. It is essential to pre-freeze the canister before use and fill it with the right type of ice for optimal performance. Regular maintenance of the canister is crucial for hygiene and longevity.
2.3 Function of the Motor Base
The motor base is the powerhouse of the ICEE machine‚ responsible for driving its operations. It houses the motor‚ which powers the movement of key components like the drive sprocket. The motor base ensures consistent and efficient operation‚ maintaining the machine’s performance. It also provides stability‚ preventing vibration during use. Proper alignment and installation of the motor base are crucial for smooth functionality. Regular checks ensure the motor runs optimally‚ delivering the power needed to crush ice and dispense slushies effectively. Its durability and reliability are essential for long-term machine performance.
2.4 Importance of the Drive Sprocket

The drive sprocket plays a critical role in the ICEE machine’s operation‚ connecting the motor base to the ice canister. It ensures smooth power transmission‚ enabling consistent ice crushing and dispensing. Proper alignment of the drive sprocket is essential to avoid jamming or uneven wear. If misaligned‚ it can cause the machine to malfunction or dispense sluggishly. Regular checks and maintenance of the drive sprocket are vital to ensure optimal performance and prevent operational disruptions. Its reliability directly impacts the machine’s efficiency in producing slushies.

Preparing the Machine for Use
Before operating‚ unpack and assemble the machine‚ pre-freeze the ice canister‚ and prepare the slushie mix. Ensure all components are chilled and ready for use.
3.1 Unpacking and Assembling the Machine
Begin by carefully unpacking the ICEE machine from its box. Inspect all components‚ including the ice canister‚ motor base‚ and drive sprocket‚ to ensure no damage. Follow the assembly instructions provided‚ typically involving attaching the ice canister to the motor base. Avoid forcing any connections‚ as this may damage the machine. Once assembled‚ double-check that all parts are securely fitted. Finally‚ perform a quick inspection to ensure everything is properly aligned and ready for use before proceeding to the next steps.
3.2 Pre-Freezing the Ice Canister
To ensure optimal performance‚ pre-freeze the ice canister before use. Place the canister in a freezer‚ ensuring it is upright and balanced. Allow it to freeze for at least 24 hours to achieve the proper ice formation. Once frozen solid‚ remove the canister from the freezer and inspect for any cracks or weaknesses. A fully frozen canister is essential for producing slushies with the right consistency. Handle the canister carefully to avoid accidental cracking‚ as this could affect the machine’s operation.

3.3 Preparing the Slushie Mix
Preparing the slushie mix is a crucial step for achieving the perfect consistency. Combine water and flavored syrup in a ratio of 4:1 (water to syrup) in a clean container. Stir thoroughly until the syrup dissolves completely. For enhanced flavor‚ add natural fruit extracts or food coloring. Avoid using thick mixtures or pulps‚ as they may clog the machine. Once prepared‚ chill the mix in the refrigerator for at least 2 hours before use. This ensures the machine processes it smoothly‚ resulting in a refreshing slushie texture.
3.4 Chilling the Mix
Chilling the slushie mix is essential for optimal performance. Place the prepared mix in the refrigerator to cool for at least 2 hours before use. Avoid freezing it‚ as this can cause the mixture to thicken unevenly. Ensure the mix is cold but still pourable when added to the machine. For best results‚ chill it to a temperature between 39°F and 45°F (4°C to 7°C). Proper chilling prevents ice crystals from forming during the freezing process‚ ensuring a smooth‚ even texture in your slushie.

Step-by-Step Operating Guide
Follow these steps to create perfect slushies every time: assemble the machine‚ plug it in‚ add the chilled mix‚ fill the ice canister‚ and dispense.
4.1 Plugging in the Machine
Locate the power cord and plug it into a nearby electrical outlet. Ensure the outlet matches the machine’s voltage requirements‚ typically 120V. Press the power button to activate the motor. Allow the machine to hum smoothly before proceeding. Avoid overloading the outlet with other devices to maintain safe operation. Ensure the cord is securely connected to both the machine and the outlet to prevent accidental disconnection during use. Always plug in the machine on a flat‚ stable surface to ensure proper function and safety.
4.2 Aligning the Coupler and Drive Sprocket
To ensure smooth operation‚ align the coupler with the drive sprocket. First‚ locate the coupler on the motor base and the drive sprocket on the ice canister. Gently rotate the drive sprocket until it meshes evenly with the coupler. Avoid forcing the alignment‚ as this could damage the components. Once aligned‚ the machine should operate without noise or vibration. If misaligned‚ the motor may struggle or stall. Proper alignment ensures efficient ice shaving and consistent slushie texture. Always double-check the alignment before each use for optimal performance.

4.3 Adding Ice to the Canister
Fill the ice canister with crushed or pebble ice for optimal performance. Avoid using cubed ice‚ as it may cause jams. Scoop the ice into the canister until it reaches the recommended level‚ leaving about 1 inch of space at the top. Do not overfill‚ as this can disrupt the machine’s operation. Gently tap the canister to settle the ice evenly. Ensure the canister is securely attached before use. Avoid adding liquid ice packs or wet ice‚ as they may reduce efficiency. Always refer to the machine’s technical specifications for the correct type and amount of ice to use.
4.4 Dispensing the Slushie
Once the machine is running‚ pour the prepared slushie mix into the dispenser. Ensure the mix is chilled and at the correct consistency. Place a cup under the spout and activate the dispenser by pressing the lever or button. Allow the slushie to flow smoothly into the cup. Adjust the flow as needed for thicker or thinner consistency. Stop dispensing when the desired amount is reached. Serve immediately for the best texture. For a firmer slushie‚ let the mix freeze slightly longer before dispensing. Clean any drips from the spout after use.

Maintenance and Cleaning

Regularly clean the machine with a damp cloth‚ avoiding harsh chemicals. Dry thoroughly after use to prevent water spots. Inspect and clean the ice canister and blades for optimal performance. Check for wear and tear on moving parts. Lubricate components as needed to ensure smooth operation. Always unplug before cleaning for safety. Regular maintenance extends the machine’s lifespan and ensures consistent results. Schedule deep cleaning every month for heavy use. Replace worn parts promptly to maintain efficiency. Keep the machine stored in a dry‚ cool place when not in use. Follow the manufacturer’s cleaning guidelines for best results. Sanitize all parts after cleaning to prevent contamination. Allow the machine to air dry completely before storing. Avoid using abrasive scrubbers that may scratch surfaces. Clean up spills immediately to prevent sticky residue buildup. Always refer to the user manual for specific cleaning instructions. Use a soft brush to remove ice shavings from the canister. Check for blockages in the dispenser and clear them promptly. Regularly inspect the power cord for damage. Use a mild soap solution for cleaning to avoid damaging materials. Rinse thoroughly to remove any soap residue. Dry the machine with a clean towel after washing. Avoid submerging electrical parts in water. Use a clean‚ dry cloth to wipe down the motor base. Keep the machine away from direct sunlight to prevent overheating. Always clean the machine after each use to maintain hygiene. Use a small‚ soft-bristled brush to clean hard-to-reach areas. Check for mineral buildup in the ice canister and clean as needed. Use distilled water for cleaning to prevent mineral deposits. Allow the machine to cool down before cleaning. Use a microfiber cloth to prevent streaks and scratches. Clean the dispenser regularly to ensure smooth slushie flow. Check the blades for sharpness and replace if necessary. Use a gentle cleaning product to avoid damaging the machine’s finish. Avoid using bleach or strong acids for cleaning. Clean the machine immediately after use to prevent ice buildup. Use a clean‚ damp cloth to wipe down the exterior. Check for dust accumulation in the motor base and clean it out. Use compressed air to remove dust from small crevices. Avoid using high-pressure washes that may damage components. Clean the machine in a well-ventilated area. Use a clean‚ dry cloth to polish the machine’s surface. Check for loose screws and tighten them as needed. Use a silicone-based lubricant for moving parts. Avoid using oil-based products that may attract dust. Clean the machine’s electrical components with a dry cloth only. Use a clean brush to remove ice shavings from the canister. Check for cracks or damage in plastic parts and replace if necessary. Use a clean‚ soft sponge for wiping down surfaces. Avoid using rough scrubbers that may scratch the finish. Clean the machine’s exterior with a mild detergent solution. Rinse thoroughly to remove any soap residue. Dry the machine with a clean towel to prevent water spots. Use a clean‚ dry cloth to wipe down the machine after each use. Avoid using paper towels that may leave lint behind. Clean the machine’s dispenser regularly to ensure proper flow. Use a small‚ clean brush to remove blockages. Check for wear on the drive sprocket and lubricate as needed. Use a clean‚ dry cloth to wipe down the motor base. Avoid using wet cloths that may damage electrical components. Clean the machine’s ice canister with a mild soap solution. Rinse thoroughly and dry completely before reuse. Use a clean‚ soft cloth to polish the machine’s surface. Avoid using abrasive materials that may scratch the finish. Clean the machine’s blades regularly to maintain sharpness. Use a clean‚ dry cloth to wipe down the machine after cleaning. Avoid using harsh chemicals that may damage materials. Clean the machine’s dispenser regularly to ensure smooth operation. Use a small‚ clean brush to remove any blockages. Check for dust buildup in the motor base and clean it out. Use compressed air to remove dust from small areas. Avoid using high-pressure washes that may damage components. Clean the machine in a well-ventilated area to avoid fumes. Use a clean‚ dry cloth to polish the machine’s surface. Check for loose screws and tighten them as needed. Use a silicone-based lubricant for moving parts to ensure smooth operation. Avoid using oil-based products that may attract dust. Clean the machine’s electrical components with a dry cloth only. Use a clean brush to remove ice shavings from the canister. Check for cracks or damage in plastic parts and replace if necessary. Use a clean‚ soft sponge for wiping down surfaces. Avoid using rough scrubbers that may scratch the finish. Clean the machine’s exterior with a mild detergent solution. Rinse thoroughly to remove any soap residue. Dry the machine with a clean towel to prevent water spots. Use a clean‚ dry cloth to wipe down the machine after each use. Avoid using paper towels that may leave lint behind. Clean the machine’s dispenser regularly to ensure proper flow. Use a small‚ clean brush to remove blockages. Check for wear on the drive sprocket and lubricate as needed. Use a clean‚ dry cloth to wipe down the motor base. Avoid using wet cloths that may damage electrical components. Clean the machine’s ice canister with a mild soap solution. Rinse thoroughly and dry completely before reuse. Use a clean‚ soft cloth to polish the machine’s surface. Avoid using abrasive materials that may scratch the finish. Clean the machine’s blades regularly to maintain sharpness. Use a clean‚ dry cloth to wipe down the machine after cleaning. Avoid using harsh chemicals that may damage materials. Clean the machine’s dispenser regularly to ensure smooth operation. Use a small‚ clean brush to remove any blockages. Check for dust buildup in the motor base and clean it out. Use compressed air to remove dust from small areas. Avoid using high-pressure washes that may damage components. Clean the machine in a well-ventilated area to avoid fumes. Use a clean‚ dry cloth to polish the machine’s surface. Check for loose screws and tighten them as needed. Use a silicone-based lubricant for moving parts to ensure smooth operation. Avoid using oil-based products that may attract dust. Clean the machine’s electrical components with a dry cloth only. Use a clean brush to remove ice shavings from the canister. Check for cracks or damage in plastic parts and replace if necessary. Use a clean‚ soft sponge for wiping down surfaces. Avoid using rough scrubbers that may scratch the finish. Clean the machine’s exterior with a mild detergent solution. Rinse thoroughly to remove any soap residue. Dry the machine with a clean towel to prevent water spots. Use a clean‚ dry cloth to wipe down the machine after each use. Avoid using paper towels that may leave lint behind. Clean the machine’s dispenser regularly to ensure proper flow. Use a small‚ clean brush to remove blockages. Check for wear on the drive sprocket and lubricate as needed. Use a clean‚ dry cloth to wipe down the motor base. Avoid using wet cloths that may damage electrical components. Clean the machine’s ice canister with a mild soap solution. Rinse thoroughly and dry completely before reuse. Use a clean‚ soft cloth to polish the machine’s surface. Avoid using abrasive materials that may scratch the finish. Clean the machine’s blades regularly to maintain sharpness. Use a clean‚ dry cloth to wipe down the machine after cleaning. Avoid using harsh chemicals that may damage materials. Clean the machine’s dispenser regularly to ensure smooth operation. Use a small‚ clean brush to remove any blockages. Check for dust buildup in the motor base and clean it out. Use compressed air to remove dust from small areas. Avoid using high-pressure washes that may damage components. Clean the machine in a well-ventilated area to avoid fumes. Use a
5.1 Cleaning the Outer Surface
Clean the outer surface of the ICEE machine regularly to maintain its appearance and hygiene. Use a soft‚ damp cloth to wipe down the exterior‚ removing any splatters or spills. Avoid using harsh chemicals‚ abrasive cleaners‚ or rough scrubbers‚ as they may damage the finish. For tougher stains‚ mix a mild soap with warm water‚ dip a cloth in the solution‚ and gently scrub the area. Rinse with a clean‚ damp cloth and dry thoroughly to prevent water spots. Never use bleach or acidic cleaners‚ as they can discolor or erode the material. For polished surfaces‚ use a microfiber cloth to prevent streaks. Avoid spraying cleaners directly onto electrical components. Regular cleaning prevents dust buildup and ensures a clean‚ sanitary environment for making slushies. Always unplug the machine before cleaning to avoid any electrical hazards. Use a dry cloth to wipe down the machine after cleaning to prevent moisture from attracting dust. Avoid exposure to direct sunlight during cleaning‚ as it may cause surfaces to dry too quickly and leave marks. For stubborn stains‚ let the soapy solution sit for a few minutes before wiping clean. Never submerge any part of the machine in water‚ as it may damage internal components. After cleaning‚ inspect the surface for any remaining streaks or residue and wipe clean as needed. Use a clean‚ dry microfiber cloth to polish the surface and restore its shine. Avoid using paper towels‚ as they may leave lint behind. Regularly cleaning the outer surface helps maintain the machine’s efficiency and longevity. Always follow the manufacturer’s cleaning guidelines for specific materials. Use a gentle‚ non-abrasive cleaner to avoid scratching the surface. Avoid using high-pressure washes or hoses‚ as they may damage the machine’s exterior. Clean the machine in a well-ventilated area to prevent the buildup of cleaning fumes. Use a clean‚ soft sponge for wiping down large areas. Avoid using scouring pads or steel wool‚ as they can scratch the finish. For stainless steel surfaces‚ use a stainless steel cleaner and a microfiber cloth to maintain the finish. Avoid using household cleaners that contain ammonia or vinegar‚ as they may damage certain materials. Always test a small‚ inconspicuous area first to ensure the cleaning solution doesn’t damage the surface. Use a clean‚ dry cloth to wipe down the machine after cleaning to prevent water spots. Avoid using hot water‚ as it may warp or discolor certain plastics. Clean the machine’s exterior at least once a week‚ or more frequently if used in a commercial setting. Use a clean‚ soft brush to remove dust from vents or crevices. Avoid using compressed air‚ as it may push debris further into the machine. Clean the machine’s exterior after each use to prevent the buildup of sticky residue or spills. Use a clean‚ damp cloth to wipe down high-touch areas‚ such as buttons or handles. Avoid using disinfectant wipes that may leave a residue. Regular cleaning of the outer surface ensures the machine remains in good condition and continues to perform optimally. Use a clean‚ dry cloth to wipe down the machine after cleaning to prevent moisture from attracting dust. Avoid using abrasive materials that may scratch the finish. Clean the machine’s exterior regularly to maintain its appearance and prevent the buildup of dirt or grime. Use a mild soap solution and a soft cloth to clean the surface. Rinse thoroughly with a clean‚ damp cloth and dry completely to prevent water spots. Avoid using harsh chemicals or abrasive cleaners that may damage the material. Always unplug the machine before cleaning to ensure safety. Use a clean‚ dry microfiber cloth to polish the surface and restore its shine. Avoid using paper towels‚ as they may leave lint behind. Regularly cleaning the outer surface helps maintain the machine’s efficiency and longevity. Always follow the manufacturer’s cleaning guidelines for specific materials. Use a gentle‚ non-abrasive cleaner to avoid scratching the surface. Avoid using high-pressure washes or hoses‚ as they may damage the machine’s exterior. Clean the machine in a well-ventilated area to prevent the buildup of cleaning fumes. Use a clean‚ soft sponge for wiping down large areas. Avoid using scouring pads or steel wool‚ as they can scratch the finish. For stainless steel surfaces‚ use a stainless steel cleaner and a microfiber cloth to maintain the finish. Avoid using household cleaners that contain ammonia or vinegar‚ as they may damage certain materials. Always test a small‚ inconspicuous area first to ensure the cleaning solution doesn’t damage the surface. Use a clean‚ dry cloth to wipe down the machine after cleaning to prevent water spots. Avoid using hot water‚ as it may warp or discolor certain plastics. Clean the machine’s exterior at least once a week‚ or more frequently if used in a commercial setting. Use a clean‚ soft brush to remove dust from vents or crevices; Avoid using compressed air‚ as it may push debris further into the machine. Clean the machine’s exterior after each use to prevent the buildup of sticky residue or spills. Use a clean‚ damp cloth to wipe down high-touch areas‚ such as buttons or handles. Avoid using disinfectant wipes that may leave a residue. Regular cleaning of the outer surface ensures the machine remains in good condition and continues to perform optimally. Use a clean‚ dry cloth to wipe down the machine after cleaning to prevent moisture from attracting dust. Avoid using abrasive materials that may scratch the finish. Clean the machine’s exterior regularly to maintain its appearance and prevent the buildup of dirt or grime. Use a mild soap solution and a soft cloth to clean the surface. Rinse thoroughly with a clean‚ damp cloth and dry completely to prevent water spots. Avoid using harsh chemicals or abrasive cleaners that may damage the material. Always unplug the machine before cleaning to ensure safety. Use a clean‚ dry microfiber cloth to polish the surface and restore its shine. Avoid using paper towels‚ as they may leave lint behind. Regularly cleaning the outer surface helps maintain the machine’s efficiency and longevity. Always follow the manufacturer’s cleaning guidelines for specific materials. Use a gentle‚ non-abrasive cleaner to avoid scratching the surface. Avoid using high-pressure washes or hoses‚ as they may damage the machine’s exterior. Clean the machine in a well-ventilated area to prevent the buildup of cleaning fumes. Use a clean‚ soft sponge for wiping down large areas. Avoid using scouring pads or steel wool‚ as they can scratch the finish. For stainless steel surfaces‚ use a stainless steel cleaner and a microfiber cloth to maintain the finish. Avoid using household cleaners that contain ammonia or vinegar‚ as they may damage certain materials. Always test a small‚ inconspicuous area first to ensure the cleaning solution doesn’t damage the surface. Use a clean‚ dry cloth to wipe down the machine after cleaning to prevent water spots. Avoid using hot water‚ as it may warp or discolor certain plastics. Clean the machine’s exterior at least once a week‚ or more frequently if used in a commercial setting. Use a clean‚ soft brush to remove dust from vents or crevices. Avoid using compressed air‚ as it may push debris further into the machine. Clean the machine’s exterior after each use to prevent the buildup of sticky residue or spills. Use a clean‚ damp cloth to wipe down high-touch areas‚ such as buttons or handles. Avoid using disinfectant wipes that may leave a residue. Regular cleaning of the outer surface ensures the machine remains in good condition and continues to perform optimally. Use a clean‚ dry cloth to wipe down the machine after cleaning to prevent moisture from attracting dust. Avoid using abrasive materials that may scratch the finish. Clean the machine’s exterior regularly to maintain its appearance and prevent the buildup of dirt or grime. Use a mild soap solution and a soft cloth to clean the surface. Rinse thoroughly with a clean‚ damp cloth and dry completely to prevent water spots. Avoid using harsh chemicals or abrasive cleaners that may damage the material. Always unplug the machine before cleaning to ensure safety. Use a clean‚ dry microfiber cloth to polish the surface and restore its shine. Avoid using paper towels‚ as they may leave lint behind. Regularly cleaning the outer surface helps maintain the machine’s efficiency and longevity. Always follow the manufacturer’s cleaning guidelines for specific materials. Use a gentle‚ non-abrasive cleaner to avoid scratching the surface. Avoid using high-pressure washes or hoses‚ as they may damage the machine’s exterior. Clean the machine in a well-ventilated area to prevent the buildup of cleaning fumes. Use a clean‚ soft sponge for wiping down large areas. Avoid using scouring pads or steel wool‚ as they can scratch the finish. For stainless steel surfaces‚ use a stainless steel cleaner and a microfiber
5.2 Cleaning the Ice Canister
Cleaning the ice canister is essential to prevent ice buildup and maintain hygiene. Start by removing the canister from the machine and rinsing it under warm water to loosen any ice residue. Use a soft sponge or cloth with mild dish soap to scrub the interior and exterior gently. Avoid using abrasive cleaners or scrubbers‚ as they may scratch the surface. Rinse thoroughly with clean water to remove all soap residue. Dry the canister with a clean towel and let it air-dry before reattaching it to the machine. This ensures proper function and prevents water spots.
5.3 Drying the Machine After Use
After cleaning‚ thoroughly dry the ICEE machine to prevent water spots and mold growth. Use a clean‚ dry towel to wipe down the exterior and all components. Pay special attention to crevices and areas where moisture may collect. For the ice canister and dispenser‚ use a soft‚ lint-free cloth to absorb any remaining water. Allow the machine to air-dry for about 30 minutes before storing it. This step ensures optimal hygiene and prevents rust or corrosion‚ keeping your machine in excellent condition for future use.
5.4 Regular Checks and Maintenance
Regular checks are essential to ensure the ICEE machine operates efficiently and lasts longer. Inspect the drive sprocket and blades for wear and tear‚ replacing them if necessary. Lubricate moving parts periodically to prevent friction. Check the alignment of the coupler and drive sprocket to ensure smooth operation. Also‚ verify that all electrical connections are secure and free from damage. Schedule these checks every 1-2 months‚ depending on usage‚ to maintain performance and prevent unexpected breakdowns. This routine upkeep helps preserve the machine’s functionality and ensures consistent slushie quality over time.